The Practical Guide to Self-Hosting: From Zero to a Working Homelab
Step into self-hosting with this hands-on guide, from setting up your first homelab to running essential services like a pro.
Introduction
Over the last few months, I’ve been running a self-hosted lab at home, mostly as a hobby, but also as a way to better understand infrastructure, security, and system design.
This article is a practical, end-to-end guide to self-hosting, based on what I actually built and refined over time. I’ll cover the architecture, tools, security considerations, and best practices I found useful, without assuming prior enterprise experience.
Self-hosting is often presented as either a privacy-driven ideal or an over-engineered rabbit hole. In reality, it sits somewhere in between. I wanted a controlled environment where I could deploy services, break them, secure them, and understand how everything fits together, without relying on managed platforms to abstract the hard parts away.
My setup consists of a single Raspberry Pi 5, a single-board computer that, despite its size, can run a full Linux OS and function as a small but capable home server.
To keep the homelab organized and easier to secure, I rely on containers. Containers allow services to run in isolation and make deployments predictable and repeatable. I use Docker in my homelab, although other solutions such as Kubernetes and Podman exist.
In practice, Docker lets me treat each service as a self-contained unit with its own dependencies, without worrying about conflicts on the host system. Since applications can be distributed as pre-built containers, deploying new services is usually trivial. This makes experimentation safer and recovery easier when something breaks.
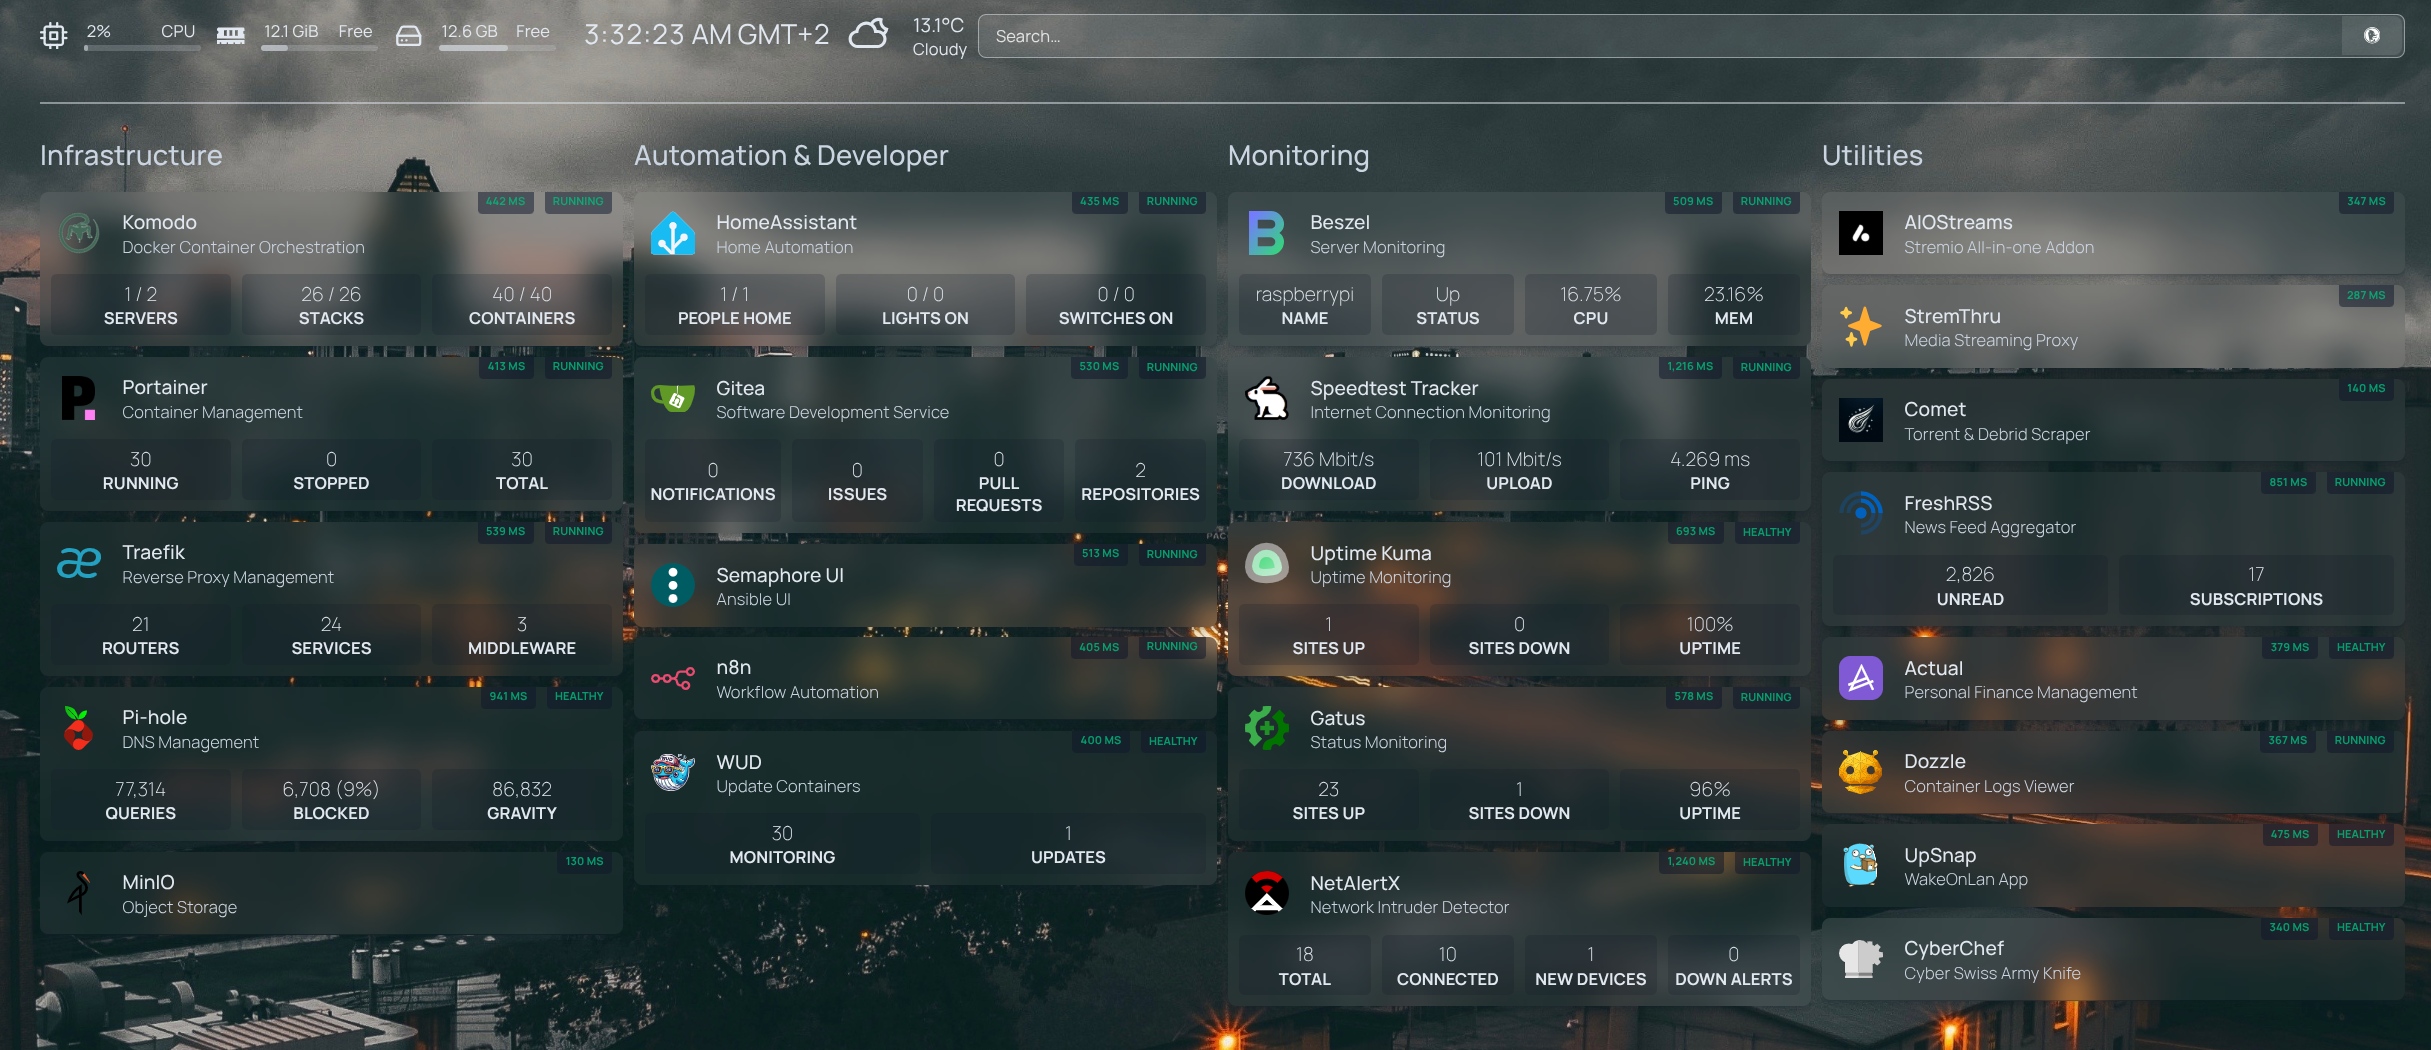
Homelab Overview
The dashboard above provides a high-level view of the services running in my homelab. Below is a brief explanation of each component and why it exists:
Homepage - A highly customizable homepage (or startpage / application dashboard) with Docker and service API integrations.
Komodo - Docker container orchestration for managing and deploying services efficiently.
Portainer - Container orchestration (while I've migrated to Komodo, I still use Portainer for some of its interface features)
Traefik - Reverse Proxy that handles inbound HTTP traffic, routes requests to the appropriate containers, and manages TLS certificates.
Pi-Hole - DNS-based ad and tracker blocker. It intercepts unwanted domains before they reach upstream DNS services like Cloudflare or Google.
MinIO - high-performance, S3 compatible object store
Home Assistant - Open source home automation that puts local control and privacy first. Powered by a worldwide community of tinkerers and DIY enthusiasts. Perfect to run on a Raspberry Pi or a local server.
Gitea - Lightweight Git service, used in my GitOps workflow (more on that later).
Semaphore - Interface for Ansible and more.
n8n - Fair-code workflow automation platform with native AI capabilities. Combine visual building with custom code, 400+ integrations.
WUD - Automates the updating of Docker containers, keeping services current without manual intervention.
Beszel - Lightweight server monitoring hub with historical data, docker stats, and alerts.
Speedtest-Tracker - Monitors your internet connection performance and uptime, with historical data for analysis.
Uptime-Kuma - Monitoring tool with a modern, intuitive interface for tracking service uptime.
Gatus - Monitoring and status page tool similar to Uptime-Kuma (I prefer config-driven tools to avoid clickops)
NetAlertX - Network intruder and presence detector. Scans for devices connected to your network and alerts you if new and unknown devices are found.
AIOStreams / Stremthru / Comet - Add-ons for Stremio, used to extend media streaming capabilities within the homelab environment.
FreshRSS - News aggregator, provides a centralized, customizable dashboard to read, organize, and track updates efficiently, giving you full control over your news consumption without relying on third-party platforms.
Actual - A local-first personal finance app
Dozzle - Realtime log viewer for containers.
UpSnap - A simple wake on lan web app.
CyberChef - The Cyber Swiss Army Knife - a web app for encryption, encoding, compression and data analysis.
Docker-volume-backup - Automatically backs up Docker volumes to prevent data loss, ensuring that important service data is preserved.
Docker-Socket-Proxy - Adds a secure layer between Docker and external clients, improving container security by controlling API access.
Authelia - Self-hosted authentication and authorization server that adds a secure single sign-on (SSO) layer for your services. It provides two-factor authentication, access control, and centralized identity management, helping protect your homelab applications from unauthorized access.
Tailscale – Mesh VPN that uses the WireGuard protocol to create secure, encrypted connections between your devices regardless of their physical location
Core Infrastructure
While my homelab includes a variety of supporting tools and applications, a small set of core services form the foundation of the environment. These services handle docker container orchestration (Komodo), version control (Gitea), network routing (Traefik), and authentication (Authelia). Understanding these components is key to grasping how everything else fits together.
Installing Docker - The Foundation of the Homelab
Before deploying any services, the first and most important step is installing Docker. Docker is the backbone of my self-hosted environment, every core service and application runs inside containers.
Using containers gives us:
- Isolation between services
- Easy upgrades and rollbacks
- Reproducible deployments
- Clean separation between the host OS and applications
Below is a simple CLI guide to prepare a Docker environment on Debian-based systems:
# Preparing the system
sudo apt update && sudo apt upgrade -y
sudo apt install -y curl gnupg lsb-release

# Installing Docker Engine
# This works well on both x86_64 servers and ARM systems like the Raspberry Pi.
curl -fsSL https://get.docker.com -o get-docker.sh
sudo sh get-docker.sh

# Running Docker without sudo
# Security note:
# Adding a user to the docker group grants effectively root-level access.
# This is acceptable in a single-user homelab but not recommended on shared systems.
sudo usermod -aG docker $USER
newgrp docker

# Enabling Docker at boot and starting the service
sudo systemctl enable docker
sudo systemctl start docker

# Testing Docker
docker --version
docker run hello-world
Defining services with Docker Compose
Now that the Docker Engine is up and running, we can use Docker Compose to define how services are built, configured, and deployed.
Docker Compose allows us to describe multi-container applications declaratively using YAML files, effectively serving as a configuration-as-code approach for Docker-based environments, similar in spirit to Helm charts in Kubernetes.
Because Docker Compose configurations are defined as code, they can be version-controlled, reviewed, and evolved over time using Git. This also makes it possible to adopt GitOps-style workflows, where infrastructure changes are tracked, auditable, and reproducible.
An example Docker Compose file might look like this:
services:
  gatus:
    image: twinproduction/gatus:latest
    container_name: gatus
    restart: unless-stopped
    volumes:
      - ./config:/config
      - gatus_data:/data
    ports:
      - "8080:8080"
    networks:
      - proxy_net

networks:
  proxy_net:
    external: true

volumes:
  gatus_data:
    driver: local
Let’s go through each key section in this Docker Compose file:
services
Defines the services that make up this application. A service typically represents a single container, though Compose allows defining multiple services in the same file. In this example, we define a single service for gatus.
image
Specifies the container image to use. By default, Docker will pull images from Docker Hub unless a different registry is explicitly defined.
container_name
Assigns a human-readable name to the running container. This makes container management and troubleshooting easier compared to relying on auto-generated names.
restart
Defines the container restart policy.
The unless-stopped policy ensures the container is automatically restarted if it crashes or the host reboots, unless it was explicitly stopped by the user.
volumes
Containers are ephemeral by design, meaning their filesystem is reset every time they are recreated. To persist data across restarts, volumes must be used.
In this setup:
- gatus_data is a named volume, defined at the bottom of the file and managed by Docker. This is the recommended approach for persistent application data.
- ./config:/config is a bind mount that maps a local configuration directory into the container. This allows configuration files to be version-controlled in Git and fits naturally into a GitOps workflow.
In more advanced setups, volumes can also be backed by external storage such as a NAS, but named volumes provide a clean and portable default.
ports
Containers are isolated from the host network by default. To expose a service (for example, a web interface), a port mapping is required using the format:
host_port:container_port
networks
Docker networks control how containers communicate with each other. By attaching this container to an external network (proxy_net), it becomes reachable by services outside this Compose file, such as a reverse proxy.
This approach is commonly used to share a single proxy network across multiple Compose stacks while keeping application-specific networks isolated.
networks (top-level)
The proxy_net network is marked as external, meaning it is created outside of this Compose file and reused across deployments. Docker Compose will not attempt to manage its lifecycle.
volumes (top-level)
Defines named volumes used by the services.
Here, gatus_data is declared as a local Docker-managed volume, ensuring persistent storage independent of container lifecycles.
Orchestrating Your Homelab with Komodo
Once Docker and Docker Compose are set up, the next challenge is managing multiple services reliably. Manually starting, stopping, or updating containers works for a few services, but as your homelab grows, it quickly becomes error-prone and tedious. This is where Komodo comes in — a lightweight orchestration tool that manages your Docker Compose deployments in a clean, automated way.
Why Komodo?
Komodo acts as a central control layer for your homelab:
- It reads your Docker Compose files and deploys services consistently.
- Handles service restarts, updates, and rollbacks automatically.
- Provides a clear and simple interface to monitor, start, stop, or inspect services without using complex Docker CLI commands.
- Supports GitOps workflows: you can include bind-mounted files (like configuration files) alongside your Compose files in a Git repository. When a webhook triggers Komodo, these files are automatically mounted into the container, ensuring your services always use the latest configuration from Git. This makes deployments reproducible and auditable.
Think of Komodo as the glue between your service definitions and your live infrastructure.
Installing Komodo
If you want to try Komodo in your homelab, follow the official installation guide: Komodo Installation.
This ensures you get the latest version and step-by-step instructions for your platform. After installing, you’ll be ready to define your first stack and start managing services. Once installed, we can start defining our services in Compose and let Komodo orchestrate them. next, we’ll look at how to integrate this with GitOps using Gitea and VSCode.
GitOps: Version-Controlled Homelab Deployments
With Komodo orchestrating your services, the next step is adopting a GitOps workflow. In GitOps, your infrastructure and application configurations live in Git, serving as the single source of truth. Any change committed to the repository is automatically applied to your environment, bringing auditability, reproducibility, and safety to managing your homelab.
Key components in this workflow
- Gitea – self-hosted Git service that stores your Compose files and configurations.
- VSCode – your preferred editor for modifying files locally before committing.
- Komodo – listens to repository updates and applies them to your running services.
Workflow diagram:
VSCode (local edits)
        ↓
Gitea (commit & push)
        ↓
Webhook triggers
        ↓
Komodo redeploy if necessary
Installing Gitea
For a homelab, Gitea is an excellent choice: it’s lightweight, easy to deploy, and fully self-hosted, making it perfect for Raspberry Pi or small servers. For full installation instructions and the latest updates, check the official guide: Gitea Documentation.
GitOps in Action: Gitea + Komodo
now that we have installed gitea + komodo let's go through how to employ such a workflow with examples:
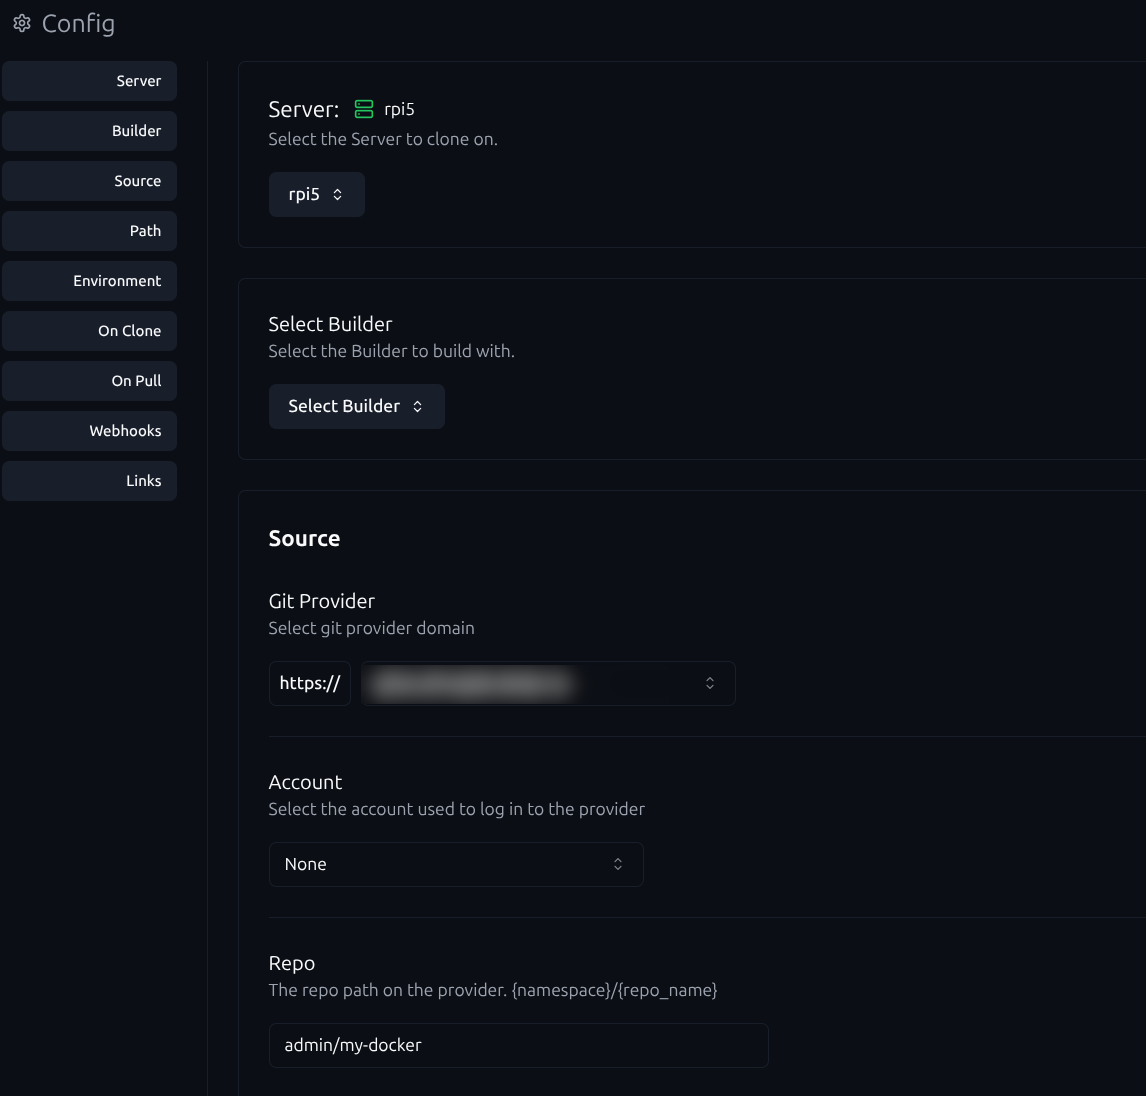
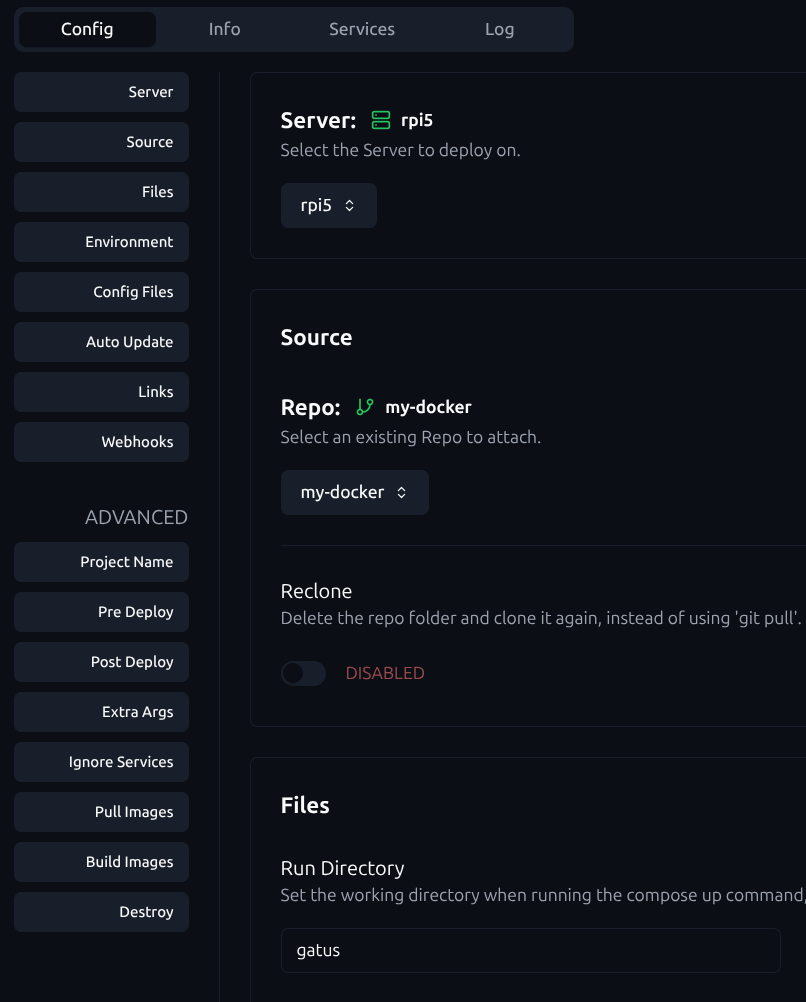
- Create a Repo resource in Komodo
define your custom Git provider and the repository name. This repository should contain all your Docker Compose files. Once the repository is created, link it to a stack in Komodo and specify a Run directory for each application or service.
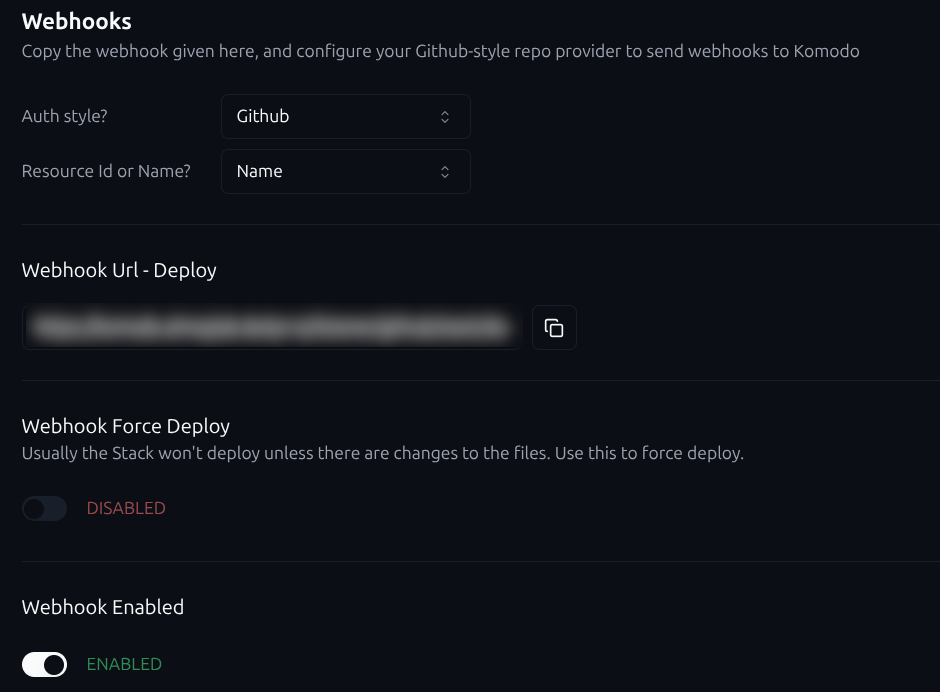
- Enable Komodo stack webhook
First, go to the Komodo stack you created and ensure the webhook is enabled. Select Github as the authentication style.
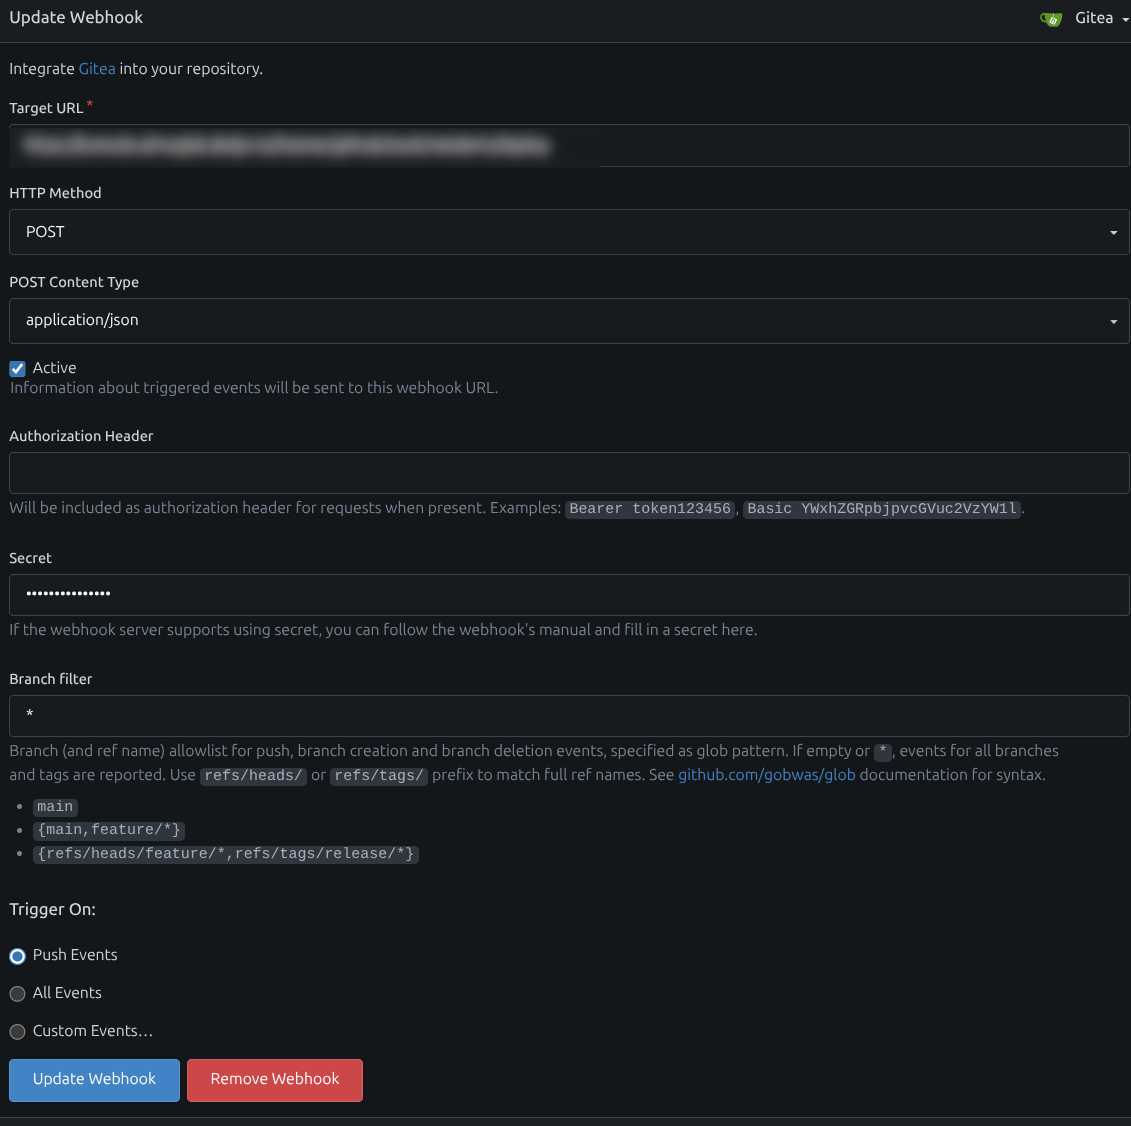
- Create a webhook in Gitea
After creating a repository in Gitea and connecting it to your local VSCode (or preferred editor), set up a webhook:
- Go to Repo Settings → Webhooks → Add Webhook
- Enter your Komodo stack webhook URL
- Set the secret (defined in your Komodo configuration)
- Trigger on Push Events
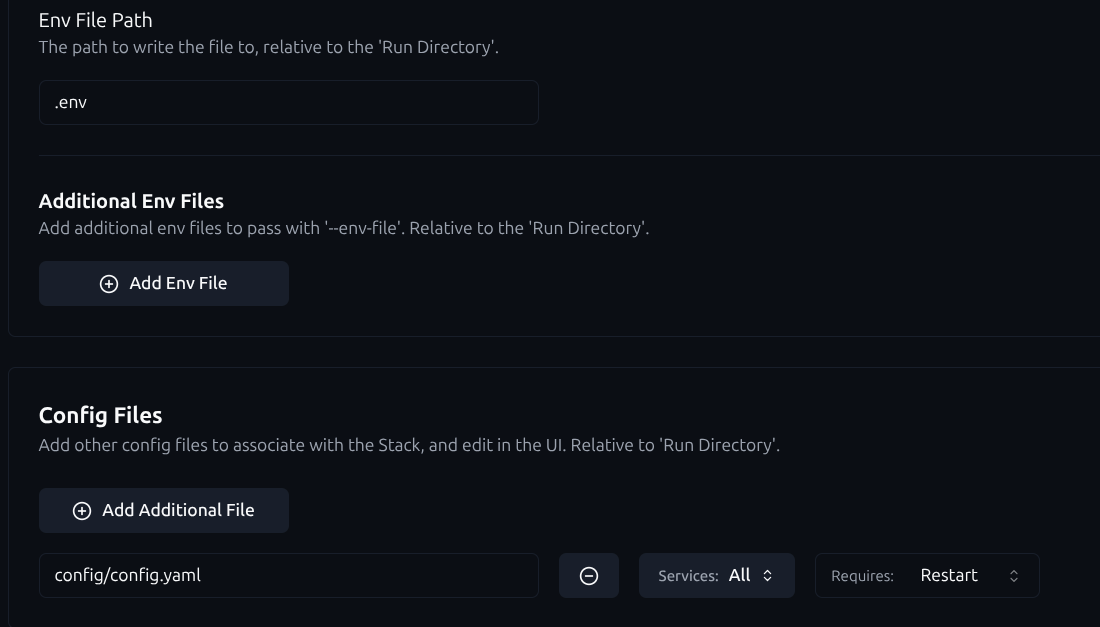
- Manage configuration & environment files
You can also include configuration and environment files in Git. In Komodo, define what happens when these files are updated, so changes are automatically applied to the corresponding container:
- Single-repo deployment management
Now you can manage all deployments in a single repository using VSCode + Git. For organization:
- Create a folder for each application in the repo
- Store as much Compose, config, and env files as possible in Git
- This ensures reproducibility, version control, and automation across your homelab
Traefik: The Reverse Proxy of Your Homelab
Traefik lets you access all your services without manually assigning ports, centralizes traffic management, and routes requests using subdomains.
Managing multiple services in a homelab can quickly get messy if you try to expose each container on a separate port. Traefik solves this by acting as a single entry point: it routes requests to the correct container based on subdomains or hostnames, manages HTTPS certificates automatically, and integrates smoothly with middleware like Authelia for authentication.
Why Traefik?
- Docker label support: Traefik can read labels directly from your Docker Compose files, allowing routing rules, entry points, and middleware to be defined alongside the service itself. This makes configuration clear, versionable, and fully compatible with a GitOps workflow.
- Automatic TLS with DNS-01 challenge: Traefik can automatically issue and renew HTTPS certificates using the DNS-01 challenge, useful for domains behind dynamic IPs or when HTTP validation isn’t practical.
- Middleware capabilities & Authelia integration: Traefik’s middleware system allows you to integrate Authelia seamlessly, adding authentication, 2FA, and access control to your services without modifying the services themselves.
- Highly extensible: Traefik supports a variety of plugins for additional functionality that alternatives like Nginx Proxy Manager or Caddy may not support.
Installing Traefik
Getting Traefik up and running is straightforward. The official documentation provides detailed instructions for Docker, Docker Compose, and other environments:
Using Traefik With Your Own Domain
Having a domain for your homelab makes accessing services easier and more organized. Instead of remembering IP addresses, you can use friendly URLs like *.home.example or service.home.example.
For my homelab, I used deSEC, a free and secure DNS provider. I created a wildcard domain that points to my Traefik server — this works whether your services stay local only or are exposed to the internet.
Why a Domain Helps
- Easier service organization: Instead of remembering IP addresses or ports, each service can have a clear subdomain (e.g.,
gatus.home.example,homepage.home.example), which keeps your homelab structured. - Simplifies TLS setup: With a domain, Traefik can automatically issue and renew certificates (via DNS-01 challenge and Let’s Encrypt) for all your services, making HTTPS management straightforward.
Traefik deSEC Plugin
- Create a domain in deSEC
after registering a free account on deSEC, you can create your own domain under Domain Management (for example:mylab.dedyn.io).
Create a wildcard DNS record (*) and point it to your Traefik instance’s IP address. This allows all subdomains to resolve to Traefik. - Generate a deSEC API token
Under Token Management, generate an API token and supply it to Traefik using theDESEC_TOKENenvironment variable.
This allows Traefik to programmatically create and validate DNS records during certificate issuance. - Configure Let’s Encrypt email
Provide aLETSENCRYPT_EMAILin Traefik’s configuration. This email is used by Let’s Encrypt for expiration notices and account recovery.
Enable the deSEC ACME DNS-01 challenge in Traefik
Configure Traefik’s command arguments and environment variables to use the deSEC ACME provider with the DNS-01 challenge, This enables automatic TLS certificate enrollment and renewal
It is very important to use a named volume for Traefik’s certificate storage (ACME data). This ensures certificates persist across container restarts.
I’ve included my Traefik Docker Compose file below to show a practical, working configuration for using deSEC with Let’s Encrypt via the DNS-01 challenge.
Rather than a minimal example, this reflects my actual homelab setup, including certificate persistence, networking, and provider configuration.
The stack assumes the existence of an external Docker network named proxy_net, which is used to connect Traefik with other services that should be exposed through the reverse proxy. If you don’t already have this network, you can create it once on the host:
docker network create proxy_netThe stack also includes a docker-socket-proxy, which allows Traefik to discover containers without having full access to the Docker daemon. This is a deliberate security choice and something we’ll dive into later.
services:
  traefik-socket-proxy:
    image: linuxserver/socket-proxy
    container_name: traefik-socket-proxy
    restart: unless-stopped
    environment:
      - CONTAINERS=1       # allow GET /containers/json and /containers/{id}/json
      - POST=0             # disallow any container modifications
      - PUT=0              # disallow container updates
      - NETWORKS=1         # allow GET /networks (so Traefik knows container networks)
      - LOG_LEVEL=debug
    volumes:
      - /var/run/docker.sock:/var/run/docker.sock:ro
    networks:
      - traefik_socket_net

  traefik:
    image: traefik:latest
    container_name: traefik
    restart: unless-stopped
    depends_on:
      - traefik-socket-proxy
    command:
      - "--providers.docker=true"
      - "--providers.docker.exposedbydefault=false"
      - "--providers.docker.network=proxy_net"
      - "--providers.docker.endpoint=tcp://traefik-socket-proxy:2375"

      # Entrypoints
      - "--entrypoints.web.address=:80"
      - "--entrypoints.websecure.address=:443"
      - "--entrypoints.ssh.address=:2222"

      # Let's Encrypt with deSEC DNS challenge
      - "--certificatesresolvers.desec.acme.dnschallenge=true"
      - "--certificatesresolvers.desec.acme.dnschallenge.provider=desec"
      - "--certificatesresolvers.desec.acme.email=${LETSENCRYPT_EMAIL}"
      - "--certificatesresolvers.desec.acme.storage=/letsencrypt/acme.json"
      - "--certificatesresolvers.desec.acme.dnschallenge.delayBeforeCheck=120"


      # Enable dashboard on port 8080
      - "--api.dashboard=true"

    ports:
      #- "80:80"
      - "443:443"
      - "2222:2222"
      #- "8080:8080" # dashboard

    volumes:
      - letsencrypt_acme:/letsencrypt
    environment:
      - DESEC_TOKEN=${DESEC_TOKEN}
    networks:
      - proxy_net
      - traefik_socket_net
    labels:
      - "traefik.enable=true"
      - "traefik.http.routers.traefik.rule=Host(`redacted.your.domain`)"
      - "traefik.http.routers.traefik.entrypoints=websecure"
      - "traefik.http.routers.traefik.tls.certresolver=desec"
      - "traefik.http.routers.traefik.service=api@internal"

volumes:
  letsencrypt_acme:
    driver: local

networks:
  proxy_net:
    external: true
  traefik_socket_net:
My traefik compose file
Traefik Docker Labels
Traefik discovers and configures routes dynamically by reading Docker labels attached to containers. Instead of managing separate configuration files, routing logic lives next to the service definition itself inside your compose.yaml. This makes the setup explicit, version-controlled, and GitOps-friendly by design.
In practice, labels tell Traefik:
- Which containers should be exposed
- Which subdomain they should respond to
- Which entrypoints to use (HTTP / HTTPS)
- Which middlewares to apply (e.g., Authelia, redirects)
- Which certificate resolver to use
A Simple Example
services:
  gatus:
    image: twinproduction/gatus:latest
    labels:
      - "traefik.enable=true"
      - "traefik.http.routers.gatus.rule=Host(`gatus.mylab.dedyn.io`)"
      - "traefik.http.routers.gatus.entrypoints=websecure"
      - "traefik.http.routers.gatus.tls.certresolver=letsencrypt"
Let’s break this down.
traefik.enable=true
Explicitly tells Traefik to expose this container.
This is a good practice when Traefik is running with exposedByDefault=false, which prevents accidental exposure of internal services.
traefik.http.routers.gatus.rule
Defines how requests are matched.
In this case, Traefik will route traffic only when the Host header matches gatus.mylab.dedyn.io.
traefik.http.routers.gatus.entrypoints
Specifies which entrypoint handles the traffic.
websecure usually maps to port 443 and HTTPS.
traefik.http.routers.gatus.tls.certresolver
Tells Traefik how to obtain a TLS certificate.
Here, Traefik will automatically request and renew certificates via Let’s Encrypt using the DNS-01 challenge (through deSEC, as configured earlier).
Authelia: Centralized Authentication for Your Homelab
As your homelab grows, managing separate logins for every service can quickly become cumbersome. Authelia is a self-hosted authentication and authorization server that provides Single Sign-On (SSO) and multi-factor authentication for your applications.
What is Single Sign-On (SSO)?
Single Sign-On (SSO) is an authentication method that allows a user to log in once and gain access to multiple services without re-entering credentials for each one. In practice:
- You log in to one service (the SSO provider, in this case, Authelia).
- All other connected services automatically recognize your session.
- Logging out or expiring a session centrally affects all connected services.
How Authelia Fits with Traefik
Authelia integrates directly with Traefik as a middleware. This allows you to:
- Protect specific routes or services without modifying the applications themselves.
- Enforce authentication and authorization policies at the edge, centralizing access control.
- Combine Traefik’s routing capabilities with Authelia’s security features for a seamless, secure homelab experience.
Configuring Authelia
Authelia can be deployed easily in your homelab using Docker Compose. Below, we’ll cover the basic setup and the key configuration files.
Official Documentation
For detailed deployment options and advanced configurations, you can refer to the Authelia official deployment guide.
services:
  authelia:
    image: authelia/authelia:latest
    container_name: authelia
    volumes:
      - ./config:/config
    #ports:
    #  - "9091:9091"
    depends_on:
      - redis
    restart: unless-stopped
    labels:
      - "traefik.enable=true"
      - "traefik.http.routers.authelia.rule=Host(`redacted.your.domain`)"
      - "traefik.http.routers.authelia.entrypoints=websecure"
      - "traefik.http.routers.authelia.tls.certresolver=desec"
      - "traefik.http.services.authelia.loadbalancer.server.port=9091"
     ## Setup Authelia ForwardAuth Middlewares
      - "traefik.http.middlewares.authelia.forwardauth.address=http://authelia:9091/api/authz/forward-auth"
      - "traefik.http.middlewares.authelia.forwardauth.trustforwardheader=true"
      - "traefik.http.middlewares.authelia.forwardauth.authresponseheaders=Remote-User,Remote-Groups,Remote-Name,Remote-Email"
    networks:
      - proxy_net
      - authelia_net

  redis:
    image: redis:alpine
    container_name: redis
    restart: unless-stopped
    command: ["redis-server", "--appendonly", "yes"]
    volumes:
      - authelia_redis:/data
    networks:
      - authelia_net

networks:
  proxy_net:
    external: true
  authelia_net:

volumes:
  authelia_redis:
    driver: local
My Authelia Compose File
Key Configuration Files
Authelia relies on a few core files stored under ./config:
configuration.yaml– Defines SSO settings, authentication backends, access control rules, and session management. You can refer to the community documentation for examples covering popular services like Portainer, Gitea and more.users_database.yml– Stores the list of users and their hashed passwords.- Each user entry can include groups and permissions.
- For more advanced setups, you can replace this with an LDAP or other supported identity backend.
Complementary Services
In addition to the core infrastructure, there are several supporting services that can make your homelab more reliable, secure, and easier to maintain. These tools aren’t strictly necessary to run your services, but they improve day-to-day management and enhance best practices.
Homepage
Homepage acts as a single, highly customizable dashboard that brings all your services together in one place. It integrates with Docker, service APIs, and monitoring tools to display live status, links, and useful metadata at a glance. You can see an example of my dashboard at the beginning of this post.
Where Homepage really shines is its extensive API integrations. Instead of just acting as a list of bookmarks, it allows you to monitor key aspects of your services directly from the dashboard, making it an effective operational overview rather than just a landing page.
Below is an example Docker Compose file for running Homepage. For configuration, the project provides extensive documentation and ready-made examples, which make it easy to tailor the dashboard to your own lab and gradually expand it as your setup grows.
services:
  homepage-socket-proxy:
    image: linuxserver/socket-proxy
    container_name: homepage-socket-proxy
    restart: unless-stopped
    environment:
      - CONTAINERS=1 # Allow access to viewing containers
      - SERVICES=1 # Allow access to viewing services (necessary when using Docker Swarm)
      - TASKS=1 # Allow access to viewing tasks (necessary when using Docker Swarm)
      - POST=0 # Disallow any POST operations (effectively read-only)
    volumes:
      - /var/run/docker.sock:/var/run/docker.sock:ro
    networks:
      - homepage_socket_net
  homepage:
    image: ghcr.io/gethomepage/homepage:latest
    container_name: homepage
    environment:
      HOMEPAGE_ALLOWED_HOSTS: redacted.your.domain # required, may need port. See gethomepage.dev/installation/#homepage_allowed_hosts
      PUID: 1000 # optional, your user id
      PGID: 1000 # optional, your group id
    #ports:
    #  - 3000:3000
    volumes:
      - ./config:/app/config
      - ./images:/app/public/images
    restart: unless-stopped
    networks:
      - proxy_net
      - homepage_socket_net
    labels:
      - "traefik.enable=true"
      - "traefik.http.routers.homepage.rule=Host(`redacted.your.domain`)"
      - "traefik.http.routers.homepage.entrypoints=websecure"
      - "traefik.http.routers.homepage.tls.certresolver=desec"
      - "traefik.http.routers.homepage.service=homepage"
      - "traefik.http.services.homepage.loadbalancer.server.port=3000"


networks:
  proxy_net:
    external: true
  homepage_socket_net:
My Homepage Docker Compose file
Gatus
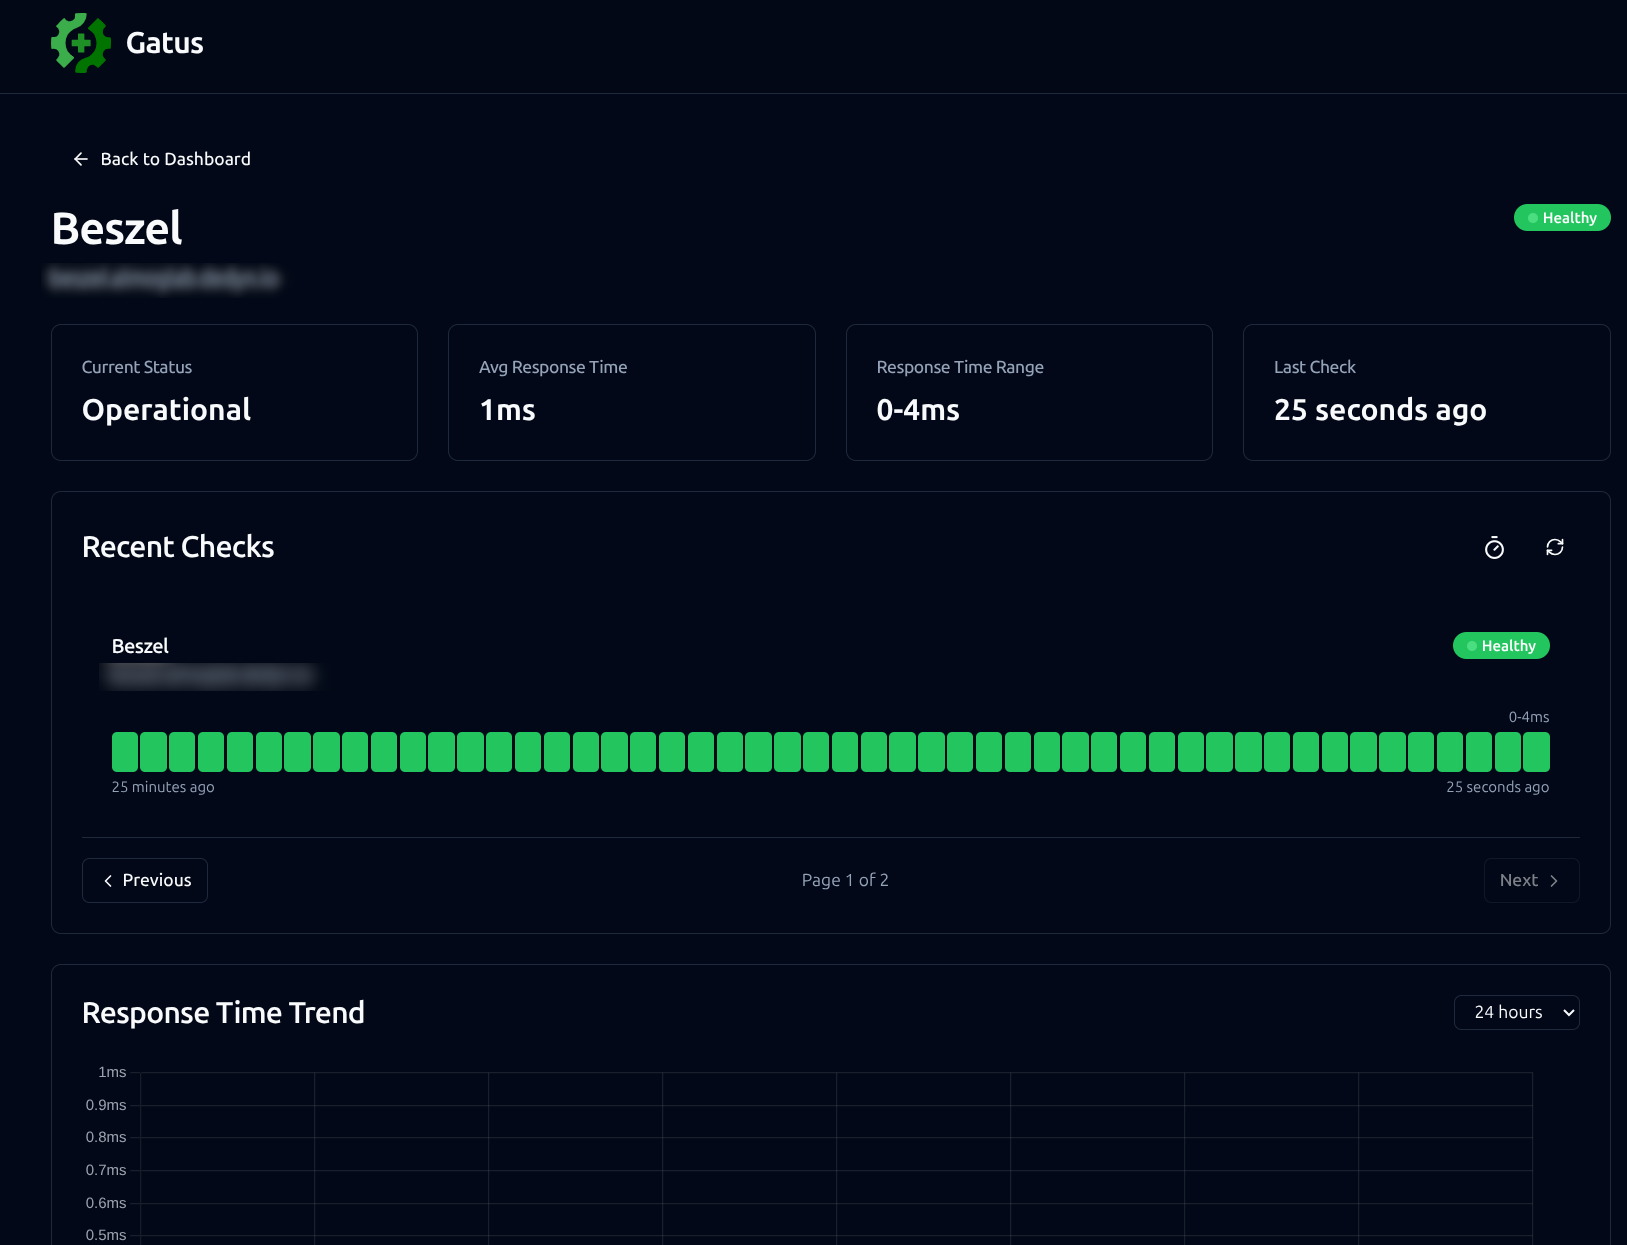
Gatus is a lightweight uptime and health monitoring service that continuously checks the availability and correctness of your services. It supports HTTP, TCP, ICMP, and DNS checks, and can validate response status codes, headers, body content, and even latency thresholds. This makes it ideal not just for detecting outages, but also for catching misconfigurations or degraded performance early. One of Gatus’s strongest features is its rich notification system: it can send alerts to Discord, Slack, ntfy.sh, and many more providers when a service goes down or recovers. Combined with its simple web UI and YAML-based configuration, Gatus gives you clear visibility into your homelab’s health and immediate feedback when something breaks, without the overhead of a full monitoring stack.
Below is an example Docker Compose file for running Gatus. The configuration itself is highly flexible, with extensive documentation and examples available in the official project repository.
services:
  gatus:
    image: twinproduction/gatus:latest
    container_name: gatus
    restart: unless-stopped
    volumes:
      - ./config:/config
      - gatus_data:/data
    #ports:
    #  - "8080:8080"
    networks:
      - proxy_net
    labels:
      - "traefik.enable=true"
      - "traefik.http.routers.gatus.rule=Host(`redacted.your.domain`)"
      - "traefik.http.routers.gatus.entrypoints=websecure"
      - "traefik.http.routers.gatus.tls.certresolver=desec"
      - "traefik.http.routers.gatus.service=gatus"
      - "traefik.http.services.gatus.loadbalancer.server.port=8080"

networks:
  proxy_net:
    external: true

volumes:
  gatus_data:
    driver: local
My Gatus Docker Compose file
WUD (Whats-up-docker)
Keeping Docker containers up-to-date is essential for security and performance. WUD automates this process by checking for new images and updating containers without manual intervention.
Below is an example Docker Compose file for WUD that automatically updates containers, prunes old images, and sends a notification to a Discord server whenever a new image is available.
Important: some services may break if updated automatically, so it’s a good idea to review release notes or test updates in a safe environment before enabling auto-updates. WUD provides fine-grained control through labels such aswud.watch,wud.tag.include, and others, allowing you to selectively manage which containers are updated and how.
services:
  whatsupdocker:
    image: getwud/wud
    container_name: wud
    volumes:
      - /var/run/docker.sock:/var/run/docker.sock
      - /etc/localtime:/etc/localtime:ro
      - wud-data:/store
    #ports:
    #  - 3000:3000
    restart: unless-stopped
    networks:
      - proxy_net
    environment:
      - WUD_TRIGGER_DOCKER_MYUPDATE_PRUNE=true
      - WUD_TRIGGER_DISCORD_NOTIFIER_URL=redacted_discord_url
    labels:
      - "traefik.enable=true"
      - "traefik.http.routers.wud.rule=Host(`redacted.your.domain`)"
      - "traefik.http.routers.wud.entrypoints=websecure"
      - "traefik.http.routers.wud.tls.certresolver=desec"
      - "traefik.http.routers.wud.service=wud"
      - "traefik.http.services.wud.loadbalancer.server.port=3000"

networks:
  proxy_net:
    external: true

volumes:
  wud-data:
My WUD Compose file
Docker-Socket-Proxy
Exposing the Docker socket (/var/run/docker.sock) directly can be risky, as it effectively grants full control over your Docker host. Docker-Socket-Proxy adds a security layer by restricting which Docker API endpoints containers can access. This helps mitigate the risk of malicious containers or containers that have been compromised from taking over your host, while still allowing necessary Docker operations.
Below is a Docker-Socket-Proxy configuration for Traefik, as shown earlier. It provides granular access control through environment variables. here, it allows only GET operations on containers and networks while disallowing any PUT or POST requests that could modify the Docker host. Traefik only needs to read information about running containers, such as labels, so this setup enforces least-privilege access, which is a key security best practice. You can find more details about the Docker-Socket-Proxy API options here.
services:
  traefik-socket-proxy:
    image: linuxserver/socket-proxy
    container_name: traefik-socket-proxy
    restart: unless-stopped
    environment:
      - CONTAINERS=1       # allow GET /containers/json and /containers/{id}/json
      - POST=0             # disallow any container modifications
      - PUT=0              # disallow container updates
      - NETWORKS=1         # allow GET /networks (so Traefik knows container networks)
      - LOG_LEVEL=debug
    volumes:
      - /var/run/docker.sock:/var/run/docker.sock:ro
    networks:
      - traefik_socket_net
Docker-Volume-Backup
Persistent data is essential for databases, configs, and other stateful services. docker-volume-backup allows you to automate volume snapshots and store them safely.
Below is an example docker-volume-backup Compose file that creates a backup of the homeassistant volume once per day and uploads it to a MinIO bucket (S3-compatible object storage).
Important: some containers may need to be stopped during backup to ensure data integrity. You can enforce this by using the label docker-volume-backup.stop-during-backup=true.services:
docker-volume-backup:
image: offen/docker-volume-backup:latest
restart: always
container_name: docker-volume-backup
environment:
BACKUP_CRON_EXPRESSION: "30 20 * * *"
AWS_ACCESS_KEY_ID: "redacted"
AWS_SECRET_ACCESS_KEY: "redacted"
AWS_S3_BUCKET_NAME: "backups"
AWS_ENDPOINT: "redacted"
AWS_ENDPOINT_PROTO: "http"
volumes:
- /var/run/docker.sock:/var/run/docker.sock:ro
- /etc/localtime:/etc/localtime:ro
- /etc/timezone:/etc/timezone:ro
- homeassistant_homeassistant_config:/backup/homeassistant_config:ro
volumes:
homeassistant_homeassistant_config:
external: true
Notifications
Staying informed about your homelab’s state is crucial. Notifications can alert you to container updates, failures, network changes, or any custom events you define.
Examples:
- Discord Webhooks: Instantly push updates to your server.
- ntfy.sh: Lightweight, self-hosted, works with many services, and includes a mobile app for instant push notifications.
Summary & Key Takeaways
In this guide, we’ve walked through the foundation and heart of a modern self-hosted homelab. Here’s what we’ve covered:
- Core Infrastructure: Installing Docker and Docker Compose, setting up Komodo for orchestration & GitOps, Gitea for version-control, Traefik as a reverse proxy, and Authelia for SSO. These building blocks allow you to run and manage services reliably, securely, and with minimal clickwork.
- Complementary Services: Tools like Homepage for a centralized services dashboard, Gatus for uptime monitoring and alerting, WUD for automated container updates, docker-socket-proxy for enhanced security, docker-volume-backup for safe and persistent data storage, and notification systems like Discord or ntfy.sh to stay informed about your lab.
- Best Practices: Use least-privilege access wherever possible, keep all configurations version-controlled, store persistent data in Docker named volumes, back up critical data regularly, enable automated TLS with Traefik, and centralize authentication using Authelia.
What You Can Do With This Homelab
A homelab like this isn’t just about running a few containers - it’s about freedom and creativity. With this setup, you can:
- Build endless automations in Home Assistant, controlling all your smart devices, and even non-smart ones like ACs via IR emitters directly from your phone.
- Automate personal workflows in n8n to simplify repetitive tasks.
- Run media servers like Plex or Jellyfin to host all your movies, music, and shows locally.
- Create your own NAS or private cloud storage with MinIO and Immich, think of it as a fully local “Google Drive.”
- Deploy any service you need, from finance tools and productivity apps to specialized utilities, all under your control.
Thanks to the GitOps-friendly, modular infrastructure, your homelab can grow and evolve alongside your needs. Every new service, automation, or workflow is easy to manage, version-controlled, and maintainable, making your setup both powerful and flexible.